31. lokakuuta 2012

Mirror mirror on the wall

Viime kuussa sain tämän peilin (ilmaiseksi) ja koska se näyttää vähän aikansa eläneeltä (lue: rumalta) päätin tuunata sitä vähän. Kehyksistä on siis tulossa hopeiset ja taustalevyn kiinnikkeet täytyy uusia, jotta peilin voi ripustaa seinälle ilmat että kehykset lähtevät irti.

Last month I got this mirror (for free) and since it was so outdated (read: ugly) I decided to give it a little makeover. It's frame is going to be silver and I'll have to enforce the backing so that it can be hung on the wall without the frame falling off and breaking the mirror.

Maalasin kehykset valkoisella maalilla muutamaan kertaan ettei kukkakuvio vahingossakaan paistaisi läpi.

I gave it few coats of white paint.

Ja nyt vaan odotellaan että ulkona olisi sopivan kuiva sää, jotta pääsisin sprayailemaan.

And now I'm just waiting untill the weather allows me to go spray painting outside. (Melt snow! Melt!)

27. lokakuuta 2012

Venice how I adore you!

Löysin aivan ihanan Venetsialaista palazzoa esittävän nukkekodin! Jos en olisi jo vakaasti päättänyt tehdä tuota Yrjönaikaista kaupunki taloa tekisin ehdottomasti tällaisen, ehkä sitten joskus tulevaisuudessa kun tuo toinen on valmis. Täytyy sanoa että todella rakastuin Venetsialaisiin taloihin siellä käydessäni ja olin hieman pettynyt etten päässyt tutustumaan niihin tarkemmin sisältäpäin.

I just found a gorgeous Venetian dollhouse! If I hadn't already decided to do the Georgian townhouse I'd jump at this! Maybe somewhere in the future I'll make one like this. I have to say that I loved the houses in Venice and was a little sad that I didn't get to see them from the inside when we were there.

26. lokakuuta 2012

Halloween is canceled

Ajattelin että jos skipattais koko halloween ja siirryttäis suoraan juhlimaan joulua kun on jo luntakin! :P

I'm thinking we should skip celebrating Halloween and go straight to Christmas, we already have the snow so why wait!? :P

25. lokakuuta 2012

Stairs mockup

Lopulta päädyin pienentämään talon suunnitelmia maalaistalosta kaupunki taloon (siis 85 senttisestä 60 senttiseen).

In the end I ended up downsizing the the plans from a country house to a town house (from 85cm wide to 60cm wide).


Ja tietenkin mun täytyi jälleen kerran päivittää portaikon suunnitelmat... tein pahvimallin jolla pääsin kokeilemaan vähän miten ne kannattaisi rakentaa ja voin myöhemmin sovitella niitä itse taloon ennen kun teen lopulliset portaat. Kuvassa olevista puutikuista tulee itse astinlaudat koska ne ovat sellaisinaan juuri oikean levyisiä. Nyt täytyy vielä ostaa ovi mikä mahtuu jäljellä olevaan 9cm tilaan mikä portaiden viereen jää. Se tulee johtamaan kuviteltuun keittiöön ja muihin kuvitteellisiin talon osiin.

And I had to once again redo the stair plans... I made a cardboard model of the stairs so that I know that they actually work and fit to the space. The wooden sticks are going to be the actual steps since they are just the right width. Now I have to buy a door that fits into the 9cm space that I have left next to the steps. It's going to lead to the imaginary kitchen and other parts of the house.

Tässä on kuva hieman eri kulmasta jotta voitte paremmin hahmottaa portaiden muodon.

Here's a picture from another angle so you can see the "winding" part of the staircase.

24. lokakuuta 2012

Oops!

I was remaking the paper model of the house's facade and now that it's ready I have to say it's HUGE! It won't fit on the dresser that I was thinking of putting it on... I don't know what I was thinkin when I was deciding on the measurments...

So now the question is should I once again alter my original plan and make it narrower, maybe I could add another floor to still keep all the rooms I was planning on making.

Kaakeliuuni - Tiled stove

Olen jo jonkin aikaa kolunnut nettiä etsiessäni hyviä ohjeita kaakeliuunin tekoon, löysinkin muutaman hyvän (jotain aion käyttää muiden huoneiden uuneissa) mutta tähän uuniin en löytänyt sitä mitä hain joten lähdin rakentamaan tätä pelkän kuvan perusteella.

For a while now I've been scouring trough the internet looking for a good tutorials for tiled stoves, found few good ones (that I'm going to use for other rooms) but for this stove they were not quite what I was looking for so now I'm trying to make one with just a reference picture and trough trial and error.


Tähän asti olen päässyt. Nyt pitäisi valita mitä listaa laitan uunin yläosaan, lisäillä hieman pahvia ja tarroja antamaan uunille muotoa ja yksityiskohtia, päällystää uunin luukut metallipaperilla (näistä pitäisi tulla toimivat jos ideani onnistuu käytännössä) ja keksiä miten laatoittaa uuni.

This is what I have so far. Now I have to decide what kind of molding I want on the top part of the stove, add some cardboard and stickers to give it a little more intrest, shape and cover the stove doors with metal paper (these are going to be working ones if my idea works out) and figure out how I'm going to tile it.

Kokeilen toimiiko mun ideani käytännössä.

Dry fitting the pieces to see if this actually works.

23. lokakuuta 2012

Measure twice cut once

Olin tekemässä kaavaa nukkiksen julkisivusta kun huomasin etten voikaan tehdä suunnittelemaani 25cm leveää aulaa, sillä tulevat ikkunat ovat niin isoja etteivät ne mahdu (kauniisti) 26cm tilaan mikä niille jää jäljelle kun varaan tilaa kulmalaudoille (paitsi että ne ovat kiveä, kai tällekin on ihan joku oma sanansa mitä en tiedä) jotka haluan taloon.

Eli nyt mun täytyy muuttaa portaikon suunnitelmia ja laskeskella ne uudestaan jotta saan ne mahtumaan 20cm huoneeseen.


I was making a tempatle for the facade of the house when I noticed that I can't build a 25cm wide hall since my windows are so big that they won't fit (well they fit but it doesn't look good) in the 26 cm space that there is left after the quoin corners that I want on the house.

So now I have to change my plans for the stairs and recalculate them to fit a 20cm wide room. I wanted to have a half landing staircase but since it won't fit on the space I have to change it to either a quarter landing or winder staircase. I'm thinking of doing the quarter landing on the street level and winder on the 1st floor.


Lupasin esitellä saalistani Helsingin matkalta ja tässä sitä olisi:

I promised to show you my haul from Helsinki so here it is:

Nämä ovat Minimaailmasata. Ne odottelivat uutta lähetystä joten siellä ei ollut tarpeeksi ikkunoita mun tarpeisiini joten ostin vain yhden että pääsen mittailemaan ja suunnittelemaan ikkunoiden paikkoja. Tilaan loput sitten niiden nettikaupasta sillä yli 50€ ostoksissa postikulut ovat ilmaisia.

These are from Minimaailma. They were waiting a shipment so there wasn't as many windows as I needed so in the end I bought just one so I could measure and plan the placements. I'll order the rest later from online since from orders over 50€ the postage is free.

Ostin lähinnä rakennusmateriaalia Sinellistä. Suunnittelin käyttäväni noita pitkiä tikkuja herringbone kuvioiseen lattiaan jonka meinasin tehdä taloon.

Mostly building materials from Sinelli. I'm thinking of using the long sticks for the herringbone floor I'm doing.

HobbyPointista.

From HobbyPoint.

Nämä ovat itseasiassa Presentosta Turusta, mutta koska nuo koristelistat vaikuttavat sen verran herkiltä en lähtenyt kokeilemaan onneani kuljettaa niitä ehjinä Helsingistä asti ensin Turkuun ja sieltä vielä kotiin joten ostin ne suosiolla Turusta. Harmillisesti tuo puuliima minkä ostin olikin kuivunut käyttökelvottomaksi joten mun täytyy käydä vaihtamassa se uuteen.


These are actually form Presento (form Turku) but since the mouldings are quite easily damaged I thought not to test my luck and buy them "closer to home" since if I had bought them from Helsinki I would have had to bring them to Turku anyway before going home. Sadly the wood glue I bought was dried out so now I have to take it back there and change it to a good one.

Nämä olivat siinä paketissa mistä puhuin jo viime postauksessani. Gilders Pastea kullan, inka kullan ja mustan värisinä. All Earrings And Suppliesilta.

Here is what was inside the package I was talking about on my last post. I bought Gilders Paste in gold, inca gold and black from All Earrings And Supplies.

Back home

Helsingin viikonloppu sujui hyvin. Olisin kyllä mielelläni kuluttanut enemmänkin aikaa kierrellen askarteluliikkeitä, mutta matkaseurani ei ollut ajatuksesta kovin innokas kuluttamaan koko päivää seuraamalla minua. No ainakin tiedän minne suunnistaa seuraavalla kerralla. Kotona odotti All Earrings And Suppliesin paketti, sisällön näytän samalla kun saan kuvattua ja postattua Helsingin saalini.

The weekend in Helsinki went fine. I would have spent more time wandering around craft stores if not for my two travelling companions that weren't too keen to spend most of the day just following me around. At least now I know where to look for things next time. When I got home I had a package from All Earrings And Supplies waiting for me. I'll show you what was in there when I get to photographing and posting about my haul from Helsinki.


Veliseni halusi käydä Salkkareiden "kuvauspaikalla" mutta eihän se loppujen lopuksi sitä osoitetta muistanut muuta kun että se on "siellä jossain eduskuntatalon takana" no siellä me sitten pyörittiin aikamme. Nappailin jotain kuviakin talojen yksityiskohdista.

My brother wanted to go to the "street filming location" of a Finnish soap opera series called Salatut Elämät turned out he didn't remember the exact adress so we ended up running around Arkadianmäki! I took some pictures of the details in the houses there.


16. lokakuuta 2012

More hydrangeas

Jatkoin tänään  hortensioiden tekoa samalla kun katsoin telkkaria. Sain tehtyä kolme lisää, niiden rungot ovat aikaisemmista hortensia yritelmistäni, joihin olin käyttänyt silkkipaperia, irroitin vain vanhat terälehdet ja liimasin uudet tilalle.

Today I continued making the hydrangeas while watching tv. I got three more done, they were my earlier attempts of making hydrangeas using silkpaper I just stripped the old petals away and glued the new ones on.

Pidän todella siitä millainen tuon pienimmän värityksestä tuli, käytin siihen valkoista ja nudea (mikä oli vesiväri kynä).

I really like how the color on the smallest one turned out, I used white and nude (this was awatercolor).

Tein myös yhden missä käytin kaikkia värejä sekaisin, se näyttää ehkä kaikkein aidoimmalta joten taidan tehdä seuraavat samaan tyyliin.

I also made one with all the colors mixed together it looks maybe the most realistic so next ones will be made with the same way.

15. lokakuuta 2012

Snip snip

Aloitin uuden hullun projektin. Haluaisin muutaman hortensian konservatorioon, mutta koska minulla ei ole oikeanlaista leikkuria, enkä halua kuluttaa rahaa ostamalla kittiä päätin yrittää tehdä sen vaikeamman kautta. Leikkaamalla kaiken käsin ja värjäämällä terälehdet saadakseni kukkiin lisää eloa. Siniset kynät ovat vesivärejä mitkä tuhraantuvat kivasti kun kastelen terälehdet märällä talouspaperilla ennen kun muotoilen ne painamalla ne hiirimattoon tyhjän kuulakärkikynän avulla.

Tässä on ensimmäinen kukka tekeillä, arvioisin sen vievän noin 40 terälehteä saadakseni koko helmen (mitä käytin kukan alustana) peittoon. Olen ajatellut tehdä 4-6 kukkaa eri kokoisista helmiä, mutta luulen että siinä menee aikaa... 240 terälehden leikkaaminen käsin, siinä menee ikuisuus! Yksi asia on varma, tarvitsen paremmat sakset!


I just started a new crazy project. I want to plant some hydrangeas into the conservatory but since I don't have a right kind of flower punch nor do I want to spend money to buy a kit I decided to try to do it the hard way. By cutting everything by hand and coloring every petal to add some color variations. The blue pencils are watercolors that smudge nicely when I wet them with a paper towel before forming the shape by pressing the petals into a mousemat with an empty ballpoint pen.

Here is the first flower in progress, I'm guessing it'll take around 40 petals to wholly cover the bead that I've used as the base for the flower. I'm thinking of doing 4 to 6 flowers with varying sized beads, but I'm sure it'll take time... I mean cutting 240 petals by hand, it'll take forever! One thing is for sure, I need better scissors!

Ensimmäinen hortensia valmiina ja kolme muuta odottamassa (isompia en ole vielä tehnyt). Lopulta kukkaan meni 48 terälehteä. Se näyttää hieman tummalta, joten minun täytyy yrittää käyttää vaaleamman sinistä kynää enemmän seuraavissa kukissa.

Here's the one finished and three others waiting (for now since I haven't made the bigger ones yet). In the end it took 48 petals to finish. It looks a little dark so I have to try to use the lighter blue pencil more on the next flower.

Kokeilin myös tehdä muutaman koreanonnenpensaan oksan, mutta en pidäkään siitä miltä nuo kukinnot näyttävät joten teen ne uudelleen, kunhan vaan keksin miten...

I also tried to make a few forsythias but I don't like how the flowers look so I'm going to do them over, I just don't know how yet...

14. lokakuuta 2012

Slowly getting somewhere

Olen lopultakin päättänyt talon lopulliset mitat. Siitä tulee (k)70cm x (l)85cm x (s)35cm.

Ensi viikolla olen menossa Helsinkiin, joten meinaan käydä katsastamassa Minimaailman liikkeen jotta näkisin niiden tuotteet, sillä Minimaailman nettisivuilla joistain tuotteista puuttuu mitat. Jos en löydä sieltä etsimääni täytyy alkaa etsimään ovia ja ikkunoita ulkomailta. Olen jo löytänyt muutamia joista pidän ebaystä, mutta siellä lähetyskulut tuntuvat olevan niin kalliita! (Pihi!)

Lisäksi olen huomannut että alkuperäinen suunnitelma tehdä talosta regency perioditalo on muuttunut aikalailla. Nyt siitä on enemmänkin tulossa uusklassinen sekamelska kustavilaista, regensyä ja ranskalaista empireä... hieman pelottaa miltä se lopulta näyttää!


I finally decided on the dimensions of the house, it's going to be (h)70cm x (w)85cm x (d)35cm.

Next week I'm going to Helsinki so I'm going to check out the Minimaailma's store to see their selection on real life since on their website some of the information on dimensions are missing and such. If I don't like them I have to start hunting my windows and doors internationally. I've found some that I like on ebay but the postages seem so expensive! (Skimpy!)

Also I've noticed that my plan on making the house a regency period house has changed quite a bit. Now it's more like neoclassical mix of gustavian, regency and French empire... I'm a little afraid what I end up with!

12. lokakuuta 2012

Little surprises

Tänään löysin postilaatikostani lapun missä kerrottiin paketin odottavan minua postissa, koska mulla oli muutenkin asiaa postiin päätin hoitaa molemmat pois alta samantien.

Today I found a note in my mailbox that I had a package waiting for me at the post office, since I had to go there anyway I decided to go there right away.

Tällainen laatikosta paljastui! Huusin sen itselleni Pienen Nukkekotikaupan Huuto.net sivulta huimalla 3 eurolla +toimituskulut.

This is what I found inside the box! I got it from Pieni Nukkekotikauppa's account in Huuto.net for 3 euros +postage.
Siitä tulee tulisija työhuoneeseen/kirjastoon, jahka pääsen siihen pisteeseen että mulla on oikea talokin.

It's going to be the fireplace for the study/library when I get to the point that I actually have a house.
Lisäksi sain tänään toisenkin yllätyksen, tuttavani toi minulle lupaamansa puutavaran. Levy on 53cm x 174cm ja paksuutta sillä on 16mm. Luulen että teen siitä ainakin pohjan ja sivuseinät, väliseiniin ja kattoon voin laittaa ainakin joitan ohuempaa materiaalia... Täytyy nyt laskeskella mihin tuo materiaali määrä todellisuudessa riittää.

I also got another surprise today. My friend brought me the lumber she had promised. It's 53cm x 174cm and it's 16mm thick. I think I'll make the bottom and outer walls out of it and use something thinner on the inner walls and on the roof... I will have to see what that amount of material is infact sufficient for.

Ready for planting

Sain ruukut maalattua, mutta en ole ihan varma pidänkö väristä, se on ehkä hiukan liian rusehtava. Nyt mietinkin näyttäisivätkö ne paremmilta harmaina, ainakin sointuisivat lattiaan paremmin. Amppeli on vielä vitivalkoinen joten voisin kokeilla miltä se näyttäisi harmaana.

I got the flower pots painted, but I'm not sure if I like the color, it's a bit brown and I'm thinking if it would look better in gray atleast they would mach the floor better. The hanging flower pot is still bright white so I could try out how that one looks in gray.

Tältä ruukut näyttivät ennen maalia. No toi punanen ja amppeli on vanhempia tekeleitä, mutta saivat nekin toisen kerroksen maalia pintaansa.

This is what I had before painting. Okay the red one and the hanging one are older, but I gave them another coat of white paint.

Odottelen maalin kuivumista... kuvassa näkyy yksi ylimääräinenkin ruukku joka on saanut onnettoman kunnian toimi prototyyppinä, niin leikkuu- kuin maalausvaiheessakin. Tällä hetkellä säilytän siinä kaiken maailman pieniä härpäkkeitä työpöydälläni.

Waiting the paint to dry... in the picture there's a one extra pot that has had the unfortunate honor to be the prototype in cutting and painting. Right now it's used to hold small bits and pieces on my work table.

Tässä olen levittänyt valkoisen maalin päälle pastelli väriä sormella, kun siveltimellä en saanut väriä tarttumaan ruukun pintaan.

Here I've gone over the white paint with some pastel colors that I applied with my fingers since using a brush didn't seem to get the pastels to stick.

Sitten pitäisi valita mitä kukkia haluan konservatorioon. Löysin netistä oivan sivun, mistä löytyy satoja linkkejä miniatyyri kukkien teko ohjeisiin. Olenkin käynyt lähes jokaisen linkin läpi ja yrittänyt päättää mitä kukkia valitsisin. Nämä ruusut sinne nyt ainakin tulevat.

Now I have to pick what flowers I want to plant into the conservatory. I found this marvellous site that has links to hundreds miniature flower tutorials. I've almost been through them all trying to choose the flowers. These roses are going in at least.

8. lokakuuta 2012

Life in the conservatory

Parina viime päivänä työn alla on ollut jo pitkään kaivattu pöytä lyhty konservatorioon. Lisäksi päädyin tekemään (tai ainakin yirttämään) itse kukkaruukut koska konservatorion tila on kortilla pöydän ja tuolin sijoittelun jälkeen.

Tilan puutteen takia päädyin tekemään kranssin, mikä tulee roikkumaan katosta. Lisäksi tein amppelin, mutta en saanut siitä otettua hyvää kuvaa joten näytän sen teille kun saan sen paikoilleen.


In the last few days I've finally made the table to the lantern conservatory. I also finally decided to (atleast try to) make the flower pots and urns myself, since there was so little space left in the conservatory after the chair and table are in place.

Because of the limited space I made an wreath that's going to be hanging from the ceilling. Also I've made an hanging flower pot, but I couldn't get a good picture of it so I'll show it to you later when it's in place.
 

Tässä ovat pöydänjalat liimauksessa ja pöytälevy on odottamassa vuoroaan.

The table legs being glued to place and the table top waiting it's turn.

Pöytä koottuna ja maalattuna. Ja tietenkin piti päästä vähän sommittelemaan.

The table assembled and painted. And of course I had to play around with it a little.

Tässä vähän parempi kuva seppeleestä. Aineksia jäi vielä sen verran että voisin tehdä niitä tusinoittain, vaikka myyntiin!

A bit better picture of the wreath. Also there was so much left over materials I could make dozens of them, maybe even for sale!

5. lokakuuta 2012

A new hairdo

Tarkoitukseni on ollut tehdä nukelle uusi hame, mutta kankaan valinta ja puvun leikkauksen päättäminen ovat venyttäneet projektia jo pidemmän aikaan. Edistystä on tapahtunut sen verran että sain vihdoinkin yläosan kaavan tehtyä, nyt enää on jäljellä alaosa (luulisi olevan helppo homma) ja lopullisen kankaan valinta.

I've been meaning to make a new dress for my doll. But choosing the fabric and the style of the cut for the dress has made the project stand still for a long time. Finally I've got the pattern for the bust made, now I only need to make the pattern for the skirt (should be easy) and deciding the fabric.


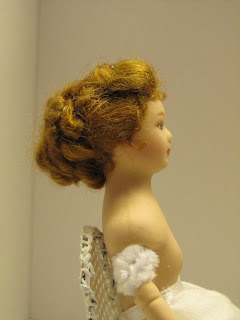
Sillä aikaa kun nukke odottaa vaatetustaan päädyin tekemään sille uuden kampauksen. Avasin nuken hiukset vanhalta lettinutturalta ja uudelleen liimasin ne haluamallani ja regency aikakauteen sopivalla tavalla.

In the mean time I ended up redoing the dolls hair. I undid the old hair do and reglued it the way I wanted and was proper for the regency period.

Tältä se näytti alunperin.

This is what it looked like before.

Ja tässä on uusi kampaus!

And here is the new do!

Still breathing...

En ole pitkään aikaan saanut mitään aikaiseksi nukkekotirintamalla, mutta tällä viikolla sitä onkin sitten tehty senkin edestä. Sain väliaikaisesti käyttööni tilan missä voin alkaa rakentamaan taloa, ja jos tuuri käy saan puutavarankin ilmaiseksi eräältä tuttavaltani jolla ei ole sille mitään käyttöä!

I haven't been doing much lately but this week I got an inspiration to do quite a bit. I got myself a temporary workingspace where I can finally start building the dollhouse, I'll even get to wood for it free from a friend who has no need for it!

Sain aikaiseksi aloittaa Ludvig XVI-tyylistä tuolia, jonka ohjeen löysin jo aikoja sitten. Ohjeessa neuvotaan leikkaamaan palat kolminkertaisina pahvista, mutta itseeni iski laiskuus ja löysin askartelu tikkuja joita olin liimannut 2 päällekäin ja laskeskelin että ne olivat saman paksuisia kun se kolminkertainen pahvi, eli säästäisin rutkasti aikaa sahaamalla osat niistä! Etujalat sahasin valmiista miniatyyri pöydänjaloista ja istuinosa on 4mm balsasta.

I started an Ludwig XVI styled chair, which directiuons I found on the net awhile ago. The guide says to cut the pieces x3 from cardboard but I decided to saw them from wood that I had made from glueing 2 layers of craft sticks together. Not only it would save time, but also my hands! Front legs are cut from some ready-made table legs and the seating is from 4mm balsawood. 


Tässä tuoli on vielä liimaus vaiheessa, mutta olin niin innoissani, että pakkohan siitä oli kuva ottaa! Kaventamalla alkuperäistä ohjetta tästä voisi myös hyvin tehdä käsinojattoman ruokailutilan tuolin.

Here is the chair still in process of gluing but I was so exited I had to take a picture! If you make the pattern narrower you could use it to make a armless dinning chair.

Osat paikoillaan ja ensimmäinen kerros maalia läästitty. Nyt pitäisi vielä keksiä millaisella kankaalla tekisin selkänojan ja istuintyynyn ja olen kahden vaiheilla jättäisinkö käsinojien pehmusteet kokonaan pois.

All the parts are in place and the first coat of paint is on. Now I have to decide what kind of fabric I'm going to use for the backrest and seatcushion, and if I'm going to cover the armrests or not.

Tässä on tulossa Kustavilaistyylisen sängyn runko. Haluaisin tehdä sängystä säädettävän, ja olen jossain netin uumenissa nähnyt ohjeet sellaisen tekoon (1:12 koossa) mutta nyt en suin surminkaan löydä sitä ohjetta joten projekti seisoo kunnes joko löydän ohjeen tai keksin jonkun fiksun ratkaisun tehdä se!

This is an ongoing project of an Gustavian style bedframe. I'd like to make it extendable and I've seen a tutorial for that somewhere on the internet but now I can't seem to find it! So now this project is on hold untill I either find it or I come up with an good idea how to make it on my own.

Toinen keskeneräinen projekti on kynttiläkruunu. Tämä oli tilanne ennen kun menin sprayaamaan sen Tiimarin kultasprayllä. Mikä vikatikki! Spray oli ennemminkin "suihku", maali levittyi todella epätasaisesti ja paksulti ja tietenkin valui, lisäksi se ei enää kestä käsittelyä vaan hilseilee joka paikkaan aina kun yritän kiinnittää siihen "kristalleja". Eli uusiksi meni tämä.

Onneksi osia vielä riittää tekemään vaikka 4 samanlaista lisää. Olenkin miettinyt että uskaltaisinko seuraavaan kokeilla kromi spraytä minkä ostin ihan 1:1 projektia varten, se on sellaista autoihin tarkoitettua, ja kallistakin oli kun mikä. Jos senkin saan epäonnistumaan vika ei enää ole spayssä vaan mun spreijaustaidoissani! Toinen vaihtoehto olisi Gilders Paste, mikä vaikuttaa fiksulta tuotteelta.

Another incompleted project is this chandelier. This picture was taken before I sprayed it with an inexpencive gold spray. Not a good idea! It was more of an shower than spray, the chandelier was swimming in the paint in some places and of course it dripped also now it is flaking of, so I can't but the beads on it without the flakes gettingeverywhere. I have to redo this.

Thank heavens I have spare parts to do this like 4 times over. I've been wondering if I dare to try spraying the next one with an chrome spray that I bought for a rl project, it's made for cars and it was kinda expencive too. If that doesn't go well either the problem is not with the pait but the painter! Another option would be Gilders Paste which seems like a good product.